Thursday, August 20, 2015

हलासन योग : विधि और लाभ

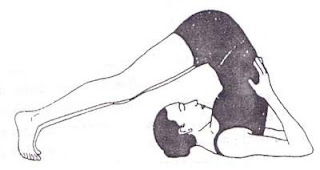
हलासन करते समय शरीर का आकार, किसानों द्वारा जमीन जोतने के लिए उपयोग में लाये जानेवाले उपकरण 'हल' के समान होने के कारण इस आसन को हलासन यह नाम दिया गया हैं। अंग्रेजी में इस आसन को 'Plow Pose' कहा जाता हैं। वजन कम करने और मेरुदंड को मजबूत, लचीला बनाने के लिए एक उत्तम आसन हैं।

हलासन की विधि, लाभ और सावधानी की जानकारी निचे दी गयी हैं :

halasana-yoga-benefits-in-hindi
हलासन योग विधि और लाभ 
हलासन की विधि 
  • एक स्वच्छ और समतल जगह पर दरी या चटाई बिछा दे। 
  • सर्वांगासन की शुरुआत की तरह जमीन पर पीठ के बल लेट जाए। 
  • दोनों पैरों को एक दुसरे से मिलाकर रखना हैं। 
  • हथेलियों को कमर के पास जमीन से सटाकर रखे। 
  • मुंह आकाश की ओर रखे और आँखों को बंद कर दे। 
  • शरीर को ढीला रखे। 
  • अब श्वास अंदर ले और पेट को सिकुड़कर पैरों को उठाना चालू करे। 
  • दोनों पैरों का शरीर से समकोण (90 degree angle) बनने पर श्वास छोड़े। 
  • सर्वांगासन की स्तिथि में आने के बाद दोनों पैरो को सिर के पीछे जमीन पर टिकाने का प्रयास करे। 
  • कमर और पीठ को पीछे झुकाने के लिए हाथों का सहारा ले। हाथ कुंहनियो (elbow) से सीधे रखते हुए पीठ के पीछे जमीन से लगाकर रखे। 
  • अपने क्षमतानुसार इस स्तिथि में रुकने के बाद, धीरे-धीरे पीठ और पैर को जमीन से लगाना शुरू करे। 
  • संपूर्ण आसन में घुटनों को मोड़ना नहीं हैं। 
हलासन के लाभ 
  1. पाचन प्रणाली और प्रजनन प्रणाली को मजबूर बनाता हैं। 
  2. पेट पर जमी अतिरिक्त चर्बी को कम करता हैं। वजन कम करने में सहायक हैं। 
  3. मधुमेह के मरीजो के लिए लाभदायक हैं।  
  4. गर्दन, कंधे, पेट, पीठ और कमर के स्नायु मजबूत बनते हैं। 
  5. मेरुदंड मजबूत और लचीला बनता हैं। 
  6. रजोनिवृत्ति (Menopause), अनिद्रा (Insomnia), बाँझपन (Infertile), सिरदर्द (Sinusitis) और थाइरोइड के विकार में यह आसन करने से लाभ मिलता हैं।  
हलासन में क्या सावधानी बरतना चाहिए ?
  • निचे दिए हुए रोगों से पीड़ित व्यक्तिओ ने यह आसन नहीं करना चाहिए :
  1. उच्च रक्तचाप - High BP 
  2. चक्कर आना - Vertigo 
  3. कमर दर्द - Lumbar Spondylitis 
  4. गर्दन में दर्द - Cervical Spondylitis 
  5. हड्डी में क्षय रोग - Bone TB 
  6. हृदयरोग - Heart disease 
  7. गर्भावस्था - Pregnancy 
  8. मासिक धर्म के प्रथम 2 दिन - Mensturation 
  • अत्यधिक मोटापा होने पर शुरुआत में कठिनाई हो सकती हैं इसलिए क्षमतानुसार धीरे-धीरे प्रयास करे।
  • पैर को ऊपर, पीछे और निचे लाते समय धीरे-धीरे क्रिया करनी है और पैरो को झटका नहीं देना हैं। 
  • कमर दर्द, गर्दन दर्द या मेरुदंड में कोई तकलीफ होने पर अपने डॉक्टर की सलाह लेकर यह आसन करे। 
हलासन का अधिक लाभ लेने के लिए हलासन करने के बाद आप मत्स्यासन भी कर सकते हैं। योगासन करते समय किसी भी तरह की तकलीफ होने पर योग विशेषज्ञ और डॉक्टर की सलाह लेना चाहिए। 

आपसे अनुरोध है कि आप आपने सुझाव, प्रतिक्रिया या स्वास्थ्य संबंधित प्रश्न निचे mail yogawithanu@gmail.com 
Keywords : Halasana Yoga benefits in Hindi, हलासन योग विधि और लाभ 


वजन कम करने के लिए आहार संबंधी सूचना


कई लोग weight loss करने हेतु dieting करते है। Dieting करने से weight loss तो होता है, पर कई बार देखा गया है की शरीर को आवश्यक nutrients और vitamins सही मात्रा में  न मिलने पर व्यक्ति काफी कमजोरी महसूस करता है। Weight loss करने के लिए हमारे शरीर की मुलभुत जरूरतों को दुर्लक्षित करना गलत है। जैसे स्वास्थय के लिए weight loss करना जरुरी है वैसे ही शरीर के लिए योग्य पोषक संतुलित आहार लेना भी जरुरी है।

शरीर को पोषण देने के अलावा आहार आपके मानसिक जरूरतों को भी पूरा करता है। मिलकर भोजन करना, अपने परवार या दोस्तों के साथ जीवन का आनंद लेने का एक महत्वपूर्ण हिस्सा है। लोग तब भी खाते है जब वे ऊबते है, अकले या हताश होते है। Weight loss करने के लिए और कम हुए वजन को बरकरार रखने के लिए यह जानना जरुरी है की कौन सी स्तिथिया या भावनाए आपको ज्यादा खाने के लिए मजबूर करती है।

http://www.nirogikaya.com/2013/09/diet-tips-for-weight-loss-in-hindi.html

निम्नलिखित कौन सी स्तिथिया आपको ज्यादा खाने के लिए मजबूर करती है ?


  • मै दिन में इतने बजे जरुर कुछ खाता हु ! ( भले ही भूक न लगी हो ) 
  • मै फिल्म देखने जाता हु। पोपकोर्न और सॉफ्ट ड्रिंक्स के बिना मजा ही क्या है !
  • पार्टी में खाने का मजा तो लेना ही चाहिए। 
  • मै होटल में हु, यहाँ कम fat वाला खाना कहा मिलता है। 
  • घर पर मेहमान आए है। 
  • रिश्तेदार या दोस्त काफी request कर रहे है, उन्हें कैसे मना कर सकता हु। 
  • मुझे नींद नहीं आती। 
  • यह तो मेरा मनपसंद व्यंजन है। 
  • खाने के लिए समय नहीं है, खाना जल्दी खाना होंगा। 
  • हर कोई पकवान खा रहा है फिर मै क्यों नहीं खा सकता। 
यह समझते हुए की आपकी ज्यादा खाने की इच्छा को कौन बढ़ाता है, तब आपके लिए अपने भोजन की आदत सुधारने  में आसानी हो जाएँगी। ज्यादा खाने की आदात से बचने के लिए अनुशासन और आपका मन वश में होना जरुरी है। 

Weight loss करने के लिए किस तरह आहार लेना चाहिए ?

योग्य संतुलित आहार लेते हुए किस तरह से Weight loss करना चाहिए इसकी अधिक जानकारी के लिए निम्नलिखित बातो का ख्याल रखे :
  • सही तरह से खाना सीखे : आहार लेते वक्त आपका पूरा ध्यान खाने के ओर होना चाहिए। खाने की बुरी आदते अक्सर वजन बढ़ने का एक मुख्य कारण होती है। TV देखते हुए, Newspaper पढ़ते  हुए या बाते करते हुए खाने की बुरी आदत को छोड़ दे ! 
  • नियमित समय पर खाना खाए : मौके देखकर खाने की आदत को ट़ाले ! खाली समय है इसलिए या काम करते वक्त खाने की आदत को टाले। नियमित समय पर खाना खाने की आदत रखने से पाचन संस्था भी अच्छी रहती और ज्यादा खाने से बचा भी जा सकता है। स्नाक्स खाने की मनाई नहीं है, पर इसका चयन समझदारी से करना चाहिए। 
  • मन को वश में रखे : जब भी आपको कुछ खाने की इच्छा हो तब खुद से ही पुछे, "क्या जो अनुभव मुझे हो रहा है वो सचमुच भूक ही है ?" खाने की इच्छा और भूक में फर्क करना सीखे। साथ ही सिर्फ इसलिए कभी न खाए की खाना पड़ा हुआ है। यदि कोई आहार खाने की इच्छा हो रही है तो उस स्थान पर न जाकर अपना ध्यान मोड़ने का प्रयास करे। ऐसी जगह न जाए जहा आपका इच्छित खाना बिकता है।  पर अगर आप सच में भूके है तो आपको खाना चाहिए। 
  • धीरे-धीरे खाए : आप जितना तेजी से खाएंगे, उतना ही ज्यादा खाएगे। आपके मस्तिष / Brain को यह समझने में २० मिनिट लगते है की आपका पेट भर चुका है। आपके शरीर यह संकेत दे की अब पर्याप्त हो चूका है, उससे पहले ही आप काफी खा चुके होते है। खाने का हर निवाला कम से कम २० बार चबा कर ही खाए। इससे पाचन भी अच्छा होता है और ज्यादा खाने की आदत से बचाव भी होता है।   
  • छोटी प्लेट/थाली का इसतेमाल करे : एक छोटी सी प्लेट लीजिए। अपनी हमेशा की मात्रा से कम भोजन पेट में लेना ही अच्छा है। छोटी प्लेट का उपयोग करने से आपको यह भी एहसास होंगा की आप हमेशा से ज्यादा खा रहे है। 
  • कम Glycemic Index (GI) वाला आहार ले : मधुमेह और वजन कम करने में कम GI वाला आहार लेना सबसे महत्वपूर्ण है। जो Carbohydrate युक्त आहार बहुत जल्दी टूटकर Glucose बन जाए और तेजी से रक्त में मिल जाए उसे ज्यादा Glycemic Index वाला आहार कहते है। कम Glycemic Index वाला आहार लेने से ज्यादा समय तक पेट भरा रहने का एहसास रहता है और कम calories मिलती है। वजन कम करने के लिए ज्यादा Glycemic Index वाला आहार लेने के बजाए कम Glycemic Index वाला आहार लेने चाहिए।    
  • छोटी छोटी खुराके ले : दिन में ३ बार बड़ा भोजन करने के बजाए दिन में ५ बार छोटी-छोटी खुराके लेना बेहतर है। यदि आपको snacks लेने की आदत है तो ३ छोटे आहार ले और बिच मे छोटे पोष्टिक snacks ले। इच्छा नहीं बल्कि भूक ही स्वाभाविक और स्वस्थ एहसास है। आपको खाने का आनंद लेना चाहिए, सिर्फ 'क्या' और 'कितना' पर ध्यान देना जरुरी है।    
  • नाश्ता (Breakfast) : सुबह का नाश्ता जरुर ले। सुबह का नाश्ता न करना मोटापे को दावत दे सकता है। नाश्ते में आप फ्रूट, उपमा, पोहा, इडली या अपना मनपसंद आहार ले सकते है। शोध से पता चला है की जो लोग सुबह नाश्ता करते है वे अपने भूक पर ज्यादा अच्छी तरह से नियंत्रण कर सकते है और ज्यादा खाने की आदत से बच सकते है। इसके विपरीत जो लोग सुबह का नाश्ता नहीं लेते है वे लोग दोपहर के समय सामान्य से ज्यादा भोजन करते है और उनमे मीठा और वसायुक्त खाने की इच्छा प्रबल होती है। आपने यह कहावत तो सुनी ही होंगी, " राजाओ की तरह नाश्ता करे, युवराज की तरह दोपहर का खाना खाए और कंगालों या गरीबो की तरह रात का खाना खाए । "
  • पानी : अपने भोजन के समय से करीब आधा घंटा पहले थोड़ा पानी या शक्कर मुक्त द्रव पदार्थ ले। इससे पेट भरा-भरा लगेगा, और आप कम खाएँगे। पर्याप्त मात्रा में पानी पिने से शरीर Hydrated रहता है और इस कारन metabolism की गति सामान्य रहती है। रोज सुबह खाली पेट 1 ग्लास गुनगुने पानी में 1 चमच्च शहद और आधा निम्बू का रस मिलाकर पिने से वजन कम होने में मदद मिलती है। इस मिश्रण को सुबह खाली पेट पिने के बाद 1 घंटे तक कुछ खाना या पीना नहीं चाहिए। ध्यान रखे की पानी गुनगुना हो, ठन्डे पानी के साथ लेने पर वजन काम होने की जगह वजन बढ़ भी सकता है।   
  • Protein युक्त आहार : अपने आहार में Protein युक्त आहार का समावेश ज्यादा करे। इससे पेट जल्दी भर जाता हैं और भूक भी कम लगती है। Protein आहार लेने से शरीर में भूक बढ़ाने वाला hormone ghrelin का निर्माण कम होता हैं। 
  • रेशे (Fiber rich food) : सब्जिया और फल अधिक खाए। फलो और सब्जियों में अधिक रेशे होते है इसलिए उनसे पेट जल्दी भर जाता है। 
  • अन्य उपाय 
  1. रोजाना विभिन्न खाद्य सामग्रियों का उपयोग करे। 
  2. तेल और अन्य सामग्रि जैसे शहद, शक्कर, केचप इत्यादि का कम से कम उपयोग करे क्योंकि इनमें ज्यादा calories होती है। 
  3. कुदरती मसाले जैसे लहसुन, अदरक, ताजी मिर्च, निम्बू इत्यादि का उपयोग करे। यह बिना calories बढ़ाए आपके खाने का स्वाद भी बढा देंगे। 
  4. Non-stick cookware का इस्तेमाल करे जो की तेल की अनावश्यक मात्रा घटाने में मदद करेंगे। 
  5. कम चर्बीयुक्त पकाने के तरीके अपनाए जैसे भापना, उबालना या भुनना। 
  6. शराब पीना बंद करे क्यों की उनसे अतिरिक्त महत्वपूर्ण पोषक तत्वों से रहित calories मिलती है।  

    आहार निर्देशक पिरामिड / Food Pyramid 

    आहार निर्देशक पिरामिड या Food Pyramid के अनुसार आहार लेना एक आदर्श एवं संतुलित आहार कहलाता है। इस पिरामिड में निचले स्तर में दिए हुए आहार पदार्थो का हमें ज्यादा से ज्यादा उपयोग लेना चाहिए और उपरी स्तर का उपयोग कम करना चाहिए। आहार पिरामिड में समावेश किए हुए सभी पदार्थ हमारे आहार में समावेश होना जरुरी है। सिर्फ एक ही वर्ग का आहार लेने से शरीर को जरुरी पोषण नहीं मिलता है।


    • निचला स्तर : निचले स्तर में चावल और वैकल्पिक आहार का समावेश है। आपको इनका अपने आहार में सर्वाधिक समावेश करना चाहिए। इसमें शामिल है starch जैसे चावल, ब्रेड, डोसा, आलू, दाले ई. आहार। 
    • मध्यम स्तर : इनमे फलो और सब्जियों का समावेश होता है। रोजाना विभिन्न प्रकार के फलो और सब्जियों का चयन करे। फल का रस लेने के बजाए ताजा फल खाए। सब्जियों के लिए पकाने के तेल का इस्तेमाल कम करे।    
    • ऊपर का स्तर : इसमें प्रोटीन आहार शामिल है जैसे की चिकन, मांस, मछली, अंडा, दूध, दही, पनीर, सोयाबीन और फलिया। 
    समझदारी युक्त और संतुलित आहार का सेवन weight loss करना आसान बना देता है और ज्यादा स्वास्थ्यकर भी । आप आज ही से अपने आहार में योग्य बदलाव कर सफल वजन नियंत्रण की शुरुआत करे।

    Wednesday, August 19, 2015

    Yoga Pose: Wheel Pose (Chakrasana)


    Contents
    ·         1 Health Benefits
    ·         2 Getting into the pose
    ·         3 Other variations
    ·         4 Preparatory Poses
    ·         5 Beginner’s Tips
    ·         6 Advanced Poses
    ·         7 Important notes

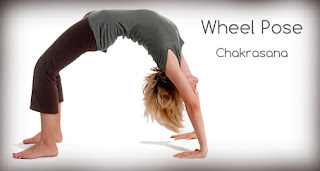
    Wheel Pose or The Upward Facing Bow Pose is also known as the Chakrasana.Chakra means wheel and the body attains the shape of a wheel on performing this pose, hence the name. It is a good back bend pose that helps to strengthen the muscles of the arms and legs. It is also effective in keeping the extra fat off your belly.

    HEALTH BENEFITS
    The wheel pose is known for strengthening the back and abdominal muscles. It is also effective in toning organs in the abdominal area, that is, the reproductive, excretory and digestive system. This pose leads to an expansion of the chest and shoulders, while strengthening the wrist, hip and lower back muscles.
    This pose helps get the body in a good shape and acts as a therapy for asthma. The wheel pose also stimulates the thyroid and pituitary glands and acts as a cure for infertility.
    GETTING INTO THE POSE
    What you need: Room with fresh air (if you are doing it outside, otherwise do it in an open area) and you
    Difficulty level: Intermediate
    Initial Position: Supine
    Drishti or Gaze: Towards the sky
    Steps
    1.            Lie on the ground in supine position with your arms to your sides. Bend your knees and draw your legs closer to your body with your feet on the floor, hip width apart. Breathe normally on a count of 1-2-3.
    1. Position your hands by the side of your ears, but not too close. Let your fingers point towards your feet.
    2. At the count of 3, begin to lift your lower body with the help of your legs and upper body with the help of your hands.
    3. Continue to lift your body till you attain a complete wheel pose and hold the pose for a minute.
    4. Release the pose and relax.
        Rest in Child’s Pose (Balasana), if you feel exerted.
    OTHER VARIATIONS
    1. Block between feet wheel pose: Often, the distance between feet that should be hip width apart tends to change or lessen. In such a case, keep a block between the inner soles of the feet which is hip width long. This will help you maintain the correct distance between the feet.
    2. One-legged wheel pose: Perform the wheel pose as usual, but lift off one leg in the air and then perform it one-legged.
    PREPARATORY POSES
    Standing Backward Bend (Ardha Chakrasana)
    BEGINNER’S TIPS
    If at first, the pose feels uncomfortable to be performed then spread the feet more than hip width apart according to your comfort and focus more on the steadiness of the body while performing this pose.
    ADVANCED POSES
    Seated Forward Bend (Paschimottanasana)
    Crocodile Pose (Makarasana)
    Corpse Pose (Savasana)
    IMPORTANT NOTES
    1. Those suffering from Carpal Tunnel Syndrome are advised to not perform this pose.
    2. Students suffering from back pain or any other spinal column injury or ailments are also not advised to perform this pose.

    Wednesday, August 12, 2015

    Yoga for sinusitis: 3 asanas that can give you instant relief

    Sinusitis is a fairly common condition in the monsoons. With annoying symptoms like a runny nose, watery eyes and a throbbing headache, sinusitis, for some, can become so severe that it may hamper your daily activities. While antibiotics and painkillers might do the trick, these medications often either leave you feeling fatigued and run-down or may have severe side effects. But there is one natural way to beat the sinusitis demon – yoga.
    Yoga can help you relieve these conditions and can bring effective reprieve from that annoying, throbbing pain and associated symptoms. In the practice of yoga, it is believed that a person suffering from sinusitis often suffers from digestive system related disorders. While some might have trouble digesting certain foods, others might  develop sensitivity to certain foods over time or have unhealthy eating habits. This is where yoga can help. One of the mainstays of yogic treatment for sinusitis (inflammation of the inner lining of the sinuses) is to practice pranayam, which can help relieve digestive disorders and respiratory ailmentsHere are the different yoga asanas and pranayams you could try to find relief from sinus related troubles.
    http://www.thehealthsite.com/diseases-conditions/yoga-for-sinus/

    Rechak-puraka pranayam: This type of pranayam depends largely on breathing in and breathing out. Unlike other pranayams, rechak-puraka pranayam does not involve holding your breath after inhalation. This form of pranayam activates all the organs of the digestive system, relieving problems like indigestion, acidity, constipation and diarrhea.Rechak-puraka Pranayam also helps your entire endocrine system and makes it function optimally. It stimulates the adrenal glands, pancreas, ovaries in females and testicles in males and aids in the proper functioning of the respiratory and circulatory system.
    Steps to do this pranayam:
    • Start by sitting in Sukhasana or Padmasana.  Remember to keep your back straight, your face looking forward and keep your arms resting on your knees with your palms facing upwards. Join your index finger and thumb, extending the other three fingers outwards.
    • Now, exhale slowly through both your nostrils and simultaneously pull your stomach inwards such that you contract your abdominal muscles. This will help expel air from your lungs. Make sure your lungs are completely emptied.
    • Next, hold that position for a few seconds and then start inhaling slowly through your nostrils. Inhale as deeply as you can, so that your abdominal muscles and chest expand. Make sure you do this gradually and not abruptly.
    • Once you have inhaled completely, start exhaling again. Follow this cycle ten to fifteen times.
    Try doing this form of pranayam about ten times initially and then gradually increase the number of times you practice it.
    Bhastrika pranayam: According to yoga experts the best time to perform Bhastrika pranayam is in the morning, on an empty stomach. Being one of the most effective breathing techniques, this pranayam can help calm your mind, bring all your doshas (vata, kapha and pitta) into balance and activate your kundalini. The best feature of this breathing technique is that it helps oxygenate your entire body, and relieves any congestion you might have in your nose, throat and sinuses. It is also great for those who suffer from stomach related disorders like indigestion, gas, acidity etc. The movement of the stomach (due to the rapid exhalation and inhalation of air) stimulates the walls of your intestine, helping it eliminate waste matter (also known as ‘ama’ in Ayurveda) and function optimally.  This asana is perfect if you want to achieve a calm mind and good digestion.
    Read on to learn about the steps to do this asana.
    Shavasana: Also known as the corpse pose, this asana is perfect to relax all the muscles, nerves and organs of your body. It is also great for people suffering from insomnia, high and low blood pressure, gastric troubles and respiratory system related illnesses. Apart from that it also helps beat stress and fatigue.
    Yogic tips to keep sinusitis at bay:
    1. Avoid having tea of coffee first thing in the morning. You may choose to have some warm water with lemon and honey as soon as you wake up, and then have a cup of tea. According to experts having tea or coffee as soon as you wake up can lead to sinusitis, so it is best you stay away from them.
    2. If you are sensitive to milk and milk products, avoid having them. If you find it difficult to avoid milk altogether  substitute it with milk-based products that you aren’t allergic to.
    3. Avoid using perfumes or hair oils that have a strong smell as it can trigger inflammation in your sinuses.
    4. Avoid eating fried and unhealthy foods very often.
    5. Avoid eating foods that have a sharp or spicy flavour.
    Disclaimer: This is only an article about yoga asanas to help relieve the symptoms of sinusitis. It should not be used instead of professional advice from a trained doctor. Please visit your doctor for proper diagnosis and treatment. 

    Image source: Getty Images

    Monday, July 6, 2015

    4 yoga poses for diabetes

    4 yoga poses for diabetes

    Yoga for diabetes
    Yoga for diabetes
    Follow these simple pranayams and asanas to control blood glucose levels

    Study after study at top Western universities confirm and reiterate what our ancient science has been preaching all along -that positive health effects of yoga are bountiful.

    For one, yoga stimulates the organs which in turn improves metabolic activities. This means that the chemical transformations within a cell are carried out more efficiently. This makes it a highly beneficial exercise for those suffering from diabetes -a complex condition which occurs due to lack of insulin production by the pancreas or lack of cell response to insulin, resulting in a multitude of metabolic imbalances involving the regulation and utilisation of insulin and glucose (sugar) in the body.
    In fact, a study published in the journal, Evidence-Based Complementary and Alternative Medicine, last year analysed available research looking at yoga's influence on diabetes and complications of diabetes (for instance, kidney problems and high blood pressure) and found that regular yoga practise led to shortterm improvements in fasting glucose and cholesterol levels. The research, conducted by Marshall Govindan and Dr Emilia RipollBunn, also found that the direct stim ulation of the pancreas by certain postures rejuvenated its capacity to produce insulin.


    Yoga practitioner Sabir Shaikh adds, "A few asanas help balance the functioning of the endocrine system.It massages and tones the abdominal organs like pancreas and liver, stimulate the nervous and circulatory system which in turn helps in controlling diabetes."

    Diabetologist Dr Pradeep Gadge concurs. "Besides medication", he says, "Yogic asanas help in harmonising the body, breath and mind, thereby contributing to the overall health of the individual. Asanas help in optimal secretions of the endocranial glands which helps insulin in the body to be used more effectively."

    Studies have also confirmed that practising certain asanas such as Ardha Matsyendrasana (half-twist pose) combined with Dhanurasana (bow pose), Vakrasana (twisted pose), Matsyendrasana (half-spinal twist), Halasana (plough pose) squeezes and compresses the abdomen and helps stimulate the pancreatic secretions or hormonal secretions. As a result, more insulin is pushed into the system. This rejuvenates the insulin producing beta cells in the pancreas of diabetics suffering from both type 1 and 2. Practising the postures in a relaxed manner, without exertion, meditation and breathing techniques help most patients control the triggers or causes of diabetes.

    Asanas over high-intensity workout

    A study, by S A Ramaiah in Washington, compared the effects of exercise such as walking, jogging on a treadmill, static cycling with asanas such as Upavishta Bakasana (sitting crane), Bakasana (standing crane) and Dhanurasana. It was found that these asanas were the most effective as they helped stimulate the hormonal secretion of the pancreas and rejuvenate its capacity to produce insulin. They also strengthened the back muscles which enhance toning of abdominal viscera (muscles and internal organs).The balancing in Bakasana improves interaction between the pituitary gland and pancreas.

    Breath of life

    Aside from asanas, breathing exercises especially anulom vilom (alternate nostril breathing) and kapalbatti (one-time inhale; exhale 30 to 50 times quickly) is extremely beneficial.Anulom vilom is found useful in diabetes as alternate nostril breathing has calming effects on the nervous system, facilitating homeostasis (internal equilibrium in the function of all the systems). This manages the stress levels, helping in diabetes treatment.

    Kapalbhatti, on the other hand, stimulates the pancreas to release insulin, thus helping control diabetes. Pranayam makes the mind calm, thus balancing the interaction between the pituitary gland and the pancreas. Kapalabhati combined with Nauli Kriya (pressure manipulations and isolation of abdominal-recti muscles) help control blood sugar. These practices balance the Basic Metabolic Rate (BMR) which in turn helps stabilise sugar levels.

    "Once you are through with the practice, relax in shavasana (lying flat on the ground) to cool off," advises Shaikh. "A yogic diet that is high in fibre, whole grains, legumes and vegetables complements the regimen. It is recommended to lose excess weight and stabilise blood sugar levels."

    Bear in mind

    Throughout the programme, monitor glucose levels under the supervision of a physician, and take appropriate medication as prescribed.

    -Practise yoga in the morning and evening for 40 to 60 minutes with the recommended series of postures according to one's capacity.
    -The maintenance period of postures should be increased gradually from five seconds to a minute, or even longer, depending on the posture and capacity of the person.
    -Always focus on breathing during the maintenance period of the posture.

    Tried and tested

    When 38-year-old Manish Chaturvedi was diagnosed with case of borderline diabetes (medically termed as pre-diabetes), a condition characterised by the presence of blood glucose levels that are higher than normal but not high enough to be classified as diabetes, he was advised by his doctor to take up yoga.

    If undiagnosed or untreated, pre-diabetes can develop into type 2 diabetes. Chaturvedi, a healthcare professional was also asked to change his sedentary lifestyle. "My mother is diabetic. When she introduced yoga in her routine, it helped control her sugar levels," he says.

    Chaturvedi began with yoga and pranayam Chaturvedi began with yoga and pranaya after his sugar hit a high. "I practised pranayam, which included anulom vilom, kapalbatti, mandukasan and ardha chakrasana (in pic) for 30 minutes every day."

    After three months of regular practise, Chaturvedi found that his practise, Chaturvedi found that his sugar levels were returned to the normal margin.

    Follow these four key yoga postures

    Vrikshasana

    Benefit:

    Helps stimulate the hormonal secretion of the pancreas.

    Method

    -Stand straight and keep your feet close to each other. Your knees, legs and hand should be held straight.
    -Now bring your right foot and keep it on your left thigh. Try to make a right angle. If you are unable to keep your foot on the thigh, try to keep your foot on the left leg wherever you feel comfortable and maintain balance. But remember your right toe should point down wards. Your body balance should depend on the left leg.
    -Join your palms and bring them to the middle of your chest and keep the figure pointing upwards. Slowly move your hands overhead. Raise your arms over your head. Your arms should be slightly bent.
    -Stand straight, look in front and try to be relaxed.
    -Stay in this position for about 10 seconds. Breathe normally.
    -Slowly bring your hands in the middle portion of the chest same as before, bring your right leg to the ground and come back in the starting position. -Repeat the same procedure with the other leg.
    -Try to repeat the whole procedure two to three times.


    Dhanurasana (Bow pose)

    Benefit:

    Improves the functioning of pancreas and intestines. Thus helps in controlling blood sugar levels. Organs like liver, pancreas, and enzyme producing organs will function actively by practicing this asana.

    Method:

    -Lie on your stomach with your feet hip width apart and your arms by the side of your body.
    -Fold your knees and hold your ankles.
    -Breathing in, lift your chest off the ground and pull your legs up and back.
    -Look straight ahead with a smile on your face. Curve your lips to match the curve of your body.
    -Keep the pose stable while paying attention to your breath. Your body is now taut as a bow.
    -Continue to take long deep breaths as you relax in this pose. But don't get carried away. Do not overdo the stretch.
    -After 15 -20 seconds, as you exhale, gently bring your legs and chest back to the ground.
    -Release the ankles and relax.

    Halasana (Plough Pose)

    Benefit:

    It stimulates the pancreas, spleen and activates immune system by massaging all the internal organs including pancreas. It improves kidney and liver functioning and strengthens the abdominal muscles. It also rejuvenates the mind.

    Method:

    -Lie on your back with your arms beside you, palms downwards.
    -As you inhale, use your abdominal muscles to lift your feet off the floor, raising your legs vertically at a 90-degree angle. Continue to breathe normally and supporting your hips and back with your hands, lift them off the ground.
    -Allow your legs to sweep in a 180-degree angle over your head till your toes touch the floor.
    -Your back should be perpendicular to the floor. This may be difficult initially, but make an attempt for a few seconds.
    -Hold this pose and let your body relax more and more with each steady breath.5 After about a minute (a few seconds for beginners) of resting in this pose, you may gently bring your legs down on exhalation. -Avoid jerking your body, while bringing the legs down.

    Ardha Matsyendrasana (Half Twist Pose)

    Benefits:

    This asana massages the kidneys, pancreas, small intestines, gall bladder and liver, helping to stimulate digestion and squeeze out toxins. Useful for diabetics, with concentration on the pancreas.Increases the elasticity of the spine, tones the spinal nerves.

    Method

    -Sit on the carpet, stretch the legs straight.
    -Fold the right leg. Keep the right leg's heel touching the left leg's knee.
    -Take the right hand to back of the waist twisting your trunk, spread palms inside and place it on the carpet.
    -Bring the left hand close to right knee and hold the right leg's ankle or big toe with the left hand.
    -Twist the head and shoulder to right side and look straight to the right shoulder's side (i.e back side).
      Thursday, June 18, 2015

      Surya Namaskar: 12 Yoga poses for weight loss

      Surya Namaskar: 12 Yoga poses for weight loss

      Yoga
      Surya Namaskar: 12 Yoga poses for weight loss (Thinkstock photos/Getty Images)
      Sun Salutation is considered a complete body workout. Yogaexperts say that doing 12 sets of Surya Namaskar translates into doing 288 powerful yoga poses in a span of 12 to 15 minutes.

      A workout for 'busy bees'

      Facing a time crunch? Want to feel fit but don't know how? Welcome to the world of Surya Namaskar. Literally translated as sun salutation, Surya Namaskar comprises a sequence of 12 yoga postures. The best part about Sun Salutation is that it works well for those 'super busy' people who often complain about not being able to do yoga because of a time crunch. Doing at least 12 sets of Sun Salutation, preferably at sunrise, at a fast pace provides a good cardiovascular workout. If done at a slower pace, these postures help tone the muscles and can be relaxing and meditative. Moreover, it allows you to enjoy the stretch and makes the body more flexible.

      Though pretty much an exercise in itself, Sun Salutation forms an excellent link between warm-ups and intense yoga postures. Start your early morning yoga routine with some warm-up stretches to ease out body stiffness. You can then do a few rounds of Sun Salutation to help increase body flexibility and also prepare the body to stretch more during the intense yoga posture sequence.

      Sun Salutation is considered a complete body workout. Yoga experts say that doing 12 sets of Surya Namaskar translates into doing 288 powerful yoga poses in a span of 12 to 15 minutes.

      Why Sun Salutation is good for you?

      But that's not all. Regular practice of Sun Salutation offers a lot of interesting benefits for every part of the body. These powerful yoga poses have a great impact on the heart, liver, intestine, stomach, chest, throat, and legs - the whole body from top to bottom. It purifies the blood and improves blood circulation throughout the body and ensures proper functioning of the stomach, bowel, and nerve centres. Practicing Sun Salutation daily helps balance the three constitutions - Vata, Pitta and Kapha - that the body is made up of.

      Your guide to Sun Salutations

      Step #1: Pranamasana (Prayer pose)


      Stand at the edge of your mat, keep your feet together and balance your weight equally on both the feet.

      Expand your chest and relax your shoulders.

      As you breathe in, lift both your arms up from the sides and as you exhale, bring your palms together in front of the chest in a prayer position.

      Step #2: Hastauttanasana (Raised arms pose)

      Breathing in, lift the arms up and back, keeping the biceps close to the ears. In this pose, the effort is to stretch the whole body up from the heels to the tips of the fingers.

      How to deepen this yoga stretch?

      You may push the pelvis forward a little bit. Ensure you're reaching up with the fingers rather than trying to bend backwards.

      Step #3: Hasta Padasana (Hand to foot pose)

      Breathing out, bend forward from the waist, keeping the spine erect. As you exhale completely, bring the hands down to the floor, beside the feet.

      How to deepen this yoga stretch?

      You may bend the knees, if necessary, to bring the palms down to the floor. Now make a gentle effort to straighten the knees.

      It's a good idea to keep the hands fixed in this position and not move them until you finish the sequence.

      Step #4: Ashwa Sanchalanasana (Equestrian pose)

      Breathing in, push your right leg back, as far back as possible. Bring the right knee to the floor and look up.

      How to deepen this yoga stretch?

      Ensure that the left foot is exactly in between the palms.

      Step #5: Dandasana (Stick pose)

      As you breathe in, take the left leg back and bring the whole body in a straight line.

      How to deepen this yoga stretch?

      Keep your arms perpendicular to the floor.

      Step #6: Ashtanga Namaskara (Salute with eight parts or points)

      Gently bring your knees down to the floor and exhale. Take the hips back slightly, slide forward, rest your chest and chin on the floor. Raise your posterior a little bit.

      The two hands, two feet, two knees, chest and chin (eight parts of the body touch the floor).

      Step #7: Bhujangasana (Cobra pose)

      Slide forward and raise the chest up into the Cobra posture.You may keep your elbows bent in this pose, the shoulders away from the ears. Look up.

      How to deepen this yoga stretch?

      As you inhale, make a gentle effort to push the chest forward; as you exhale, make a gentle effort to push the navel down. Tuck the toes under. Ensure you're stretching just as much as you can; do not force your body.

      Step #8: Parvatasana (Mountain pose)

      Breathing out, lift the hips and the tail bone up, chest downwards in an 'inverted V' (/) posture.

      How to deepen this yoga stretch?

      If possible, try and keep the heels on the ground and make a gentle effort to lift the tailbone up, going deeper into the stretch.

      Step #9: Ashwa Sanchalanasana (Equestrian pose)

      Breathing in, bring the right foot forward in between the two hands, left knee down to the floor, press the hips down and look up.

      How to deepen this yoga stretch?

      Place the right foot exactly between the two hands and the right calf perpendicular to the floor. In this position, make a gentle effort to push the hips down towards the floor, to deepen the stretch.

      Step #10: Hasta Padasana (Hand to foot pose)

      Breathing out, bring the left foot forward. Keep the palms on the floor. You may bend the knees, if necessary.

      How to deepen this yoga stretch?

      Gently straighten the knees and if you can, try and touch your nose to the knees. Keep breathing.

      Step #11: Hastauttanasana (Raised arms pose)

      Breathing in, roll the spine up, hands go up and bend backwards a little bit, pushing the hips slightly outward.

      How to deepen this yoga stretch?

      Ensure that your biceps are beside your ears. The idea is to stretch up more rather than stretch backwards.

      Step #12: Tadasana

      As you exhale, first straighten the body, then bring the arms down. Relax in this position, observe the sensations in your body.

      288 yoga poses in 12 minutes!

      One round of Sun Salutation consists of 12 yoga poses. One set consists of two rounds of Sun Salutation:first stretching the right side of your body and then the left side. So, when you do 12 sets of Sun Salutation, you are completing 12 sets x 2 rounds in each set x 12 yoga poses in each = 288 yoga poses within 12 to 15 minutes.

      Surya Namaskar calorie calculation:

      One round of Surya Namaskar burns upto 13.90 calories for an average weighing person. You can now set a target for yourself. You can slowly increase the number of rounds of surya namaskar to 108. By the time you reach this number, you will become more toned and fitter.

      30-minutes workout calorie meter: How many calories are you burning in your 30 minute workout?

      Weight lifting = 199 calories

      Tennis = 232 calories

      Basketball = 265 calories

      Beach volleyball = 265 calories

      Football = 298 calories

      Bicycling (14 - 15.9 mph) = 331 calories

      Rock climbing = 364 calories

      Running (7.5mph) = 414 calories

      Surya Namaskar = 417 calories

      (Inputs : Sri Sri Yoga teacher, The Art of living)

      Read more Personal Health, Diet & Fitness stories on www.healthmeup.com

      Yoga and lifestyle changes for Parkinson's Disease patient . योग और प्राणायाम से पार्किंसन रोग को ठीक कर सकते है

      World Parkinson Day 2024 11 अप्रैल वर्ल्ड पार्किंसन डे यानि को विश्व पार्किंसन दिवस मनाया जाता है पार्किंसन रोग नर्वस सिस्...